Isandlwana Part 2

We gathered again to finish the Isandlwana scenario we started a couple of weeks ago.

With the Natal Native Contingent forces both retreating Alan quickly ripped off his “red headband” and  quickly took control of one of the Zulu forces as one of the other players was unavailable.

The situation was looking bleak for the British with the Natal Natives missing and 5 turns to survive, flanks were waving in the air.

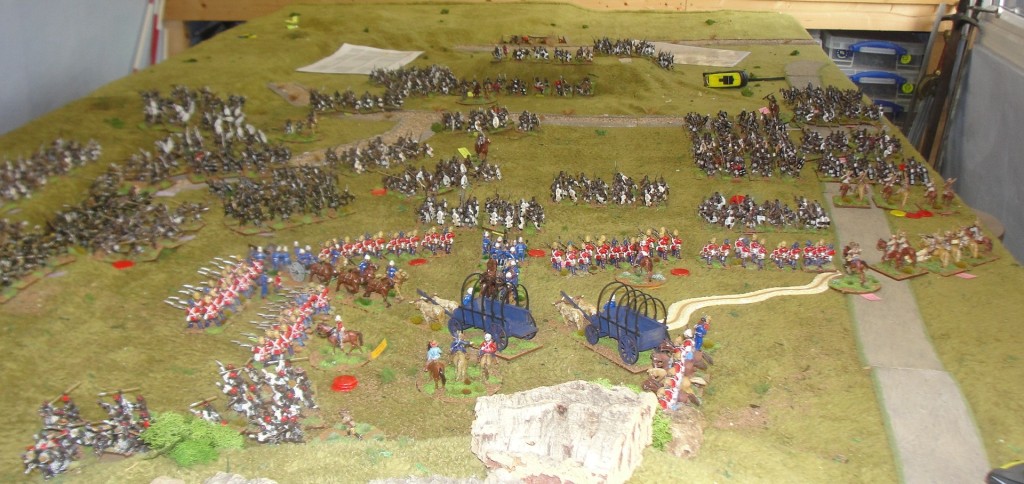
Five units of foot, two artillery pieces and the supply wagons were grimly holding on while Zulu’s “thousands of them” prepared to complete their attacks.

British forces holding as NNC fall back.

The initial attacks thundered in and the British lines held – just but both sides were taking casualties.

After surviving the first set of charges my British were hold but there was no respite as another wave of Zulus charged the line and it’s supporting gun.

Holding firm

The Infantry fell back after losing the combat and the gun was destroyed, we now had a “bit of a gap” in the lines that “Broken Dice” started to poor forces into.

But not for long

While the unit that had retreated took cover behind the donga with the supply wagons, the Zulu attacks continued. Attacks were launched on my surviving infantry unit and Paul’s forces on the left by “Uncle Albert” right horn.

Redressing the lines

My unit on the left was already shaken and when another force of Zulu’s charged this time they had had enough and broke. This meant that I was one unit away from breaking the battalia.

Another unit breaks

To make matters worse one of the units on the left flank also gave way under pressure from “Uncle Albert’s” Impi.

And another breaks

At last we managed to get the mounted units into the action and the mounted infantry came up to plug the gap on the right flank.

Mounted Infantry move to hold the flank

While the Mounted Constabulary attempted to “arrest” well shoot some of the Zulu’s from Nigel’s impi that were trying to seal off “survivors pass”.

The situation was getting grim with both surviving British battalia only needing one more unit to break at the start of turn 10 (2 more turns to last).

Trying to arrest the Zulus

Another Zulu charge on the troops defending the donga was launched.

Attack on the wagon

but this time it was “shot” away and the charge didn’t contact. This was critical as the unit defending the donga only needed to take one more casualty to go “shaken” and break the brigade.

First attack driven back

The peace didn’t last for long as another unit of Zulus charged and this time made it into contact.

Another attack rolls in

This time there was no saving the unit, additional casualties meant that the unit was already shaken and it failed the “break test” so it was off and the ammunition wagon was captured.

Finally crack

That left one unit of infantry and the mounted infantry surviving.

Last stand

The Mounted Infantry were putting in a “man of the match” performance and had managed to “shake” the unit of Zulus to their front.

Holding the line

While the infantry managed to break a unit of Zulus that charged them and in doing so break “Uncle Albert” Impi of the right horn.

Driving off another attack

It was now the last turn and the Zulus needed to try and break the last British brigade. First up the “left horn” launched a charge against the mounted infantry who elected to stand and volley the Zulus as they charged. This not only managed to “shake” the unit and stop the charge but also break the left horn impi.

Stopping another charge

In a desperate last attempt to break the last of the British one of the Zulu chieftains attempted to join a unit and lead it into a last charge before darkness fell. Fortunately for the British the attempt failed and the game ended.

Still standing – just

So when the dust settled it was time to consider how the British had lost their colours (but these seem to have distracted Nigel’s Impi who basically refused to move after they captured them), captured the ammunition wagons and destroyed the artillery. But they had not managed to break all the British brigades. So at the end it was declared as a “minor victory” for the Zulus. As for the British we managed to break two of the Zulu Impis so at least me and Paul considered it a moral victory for the British.

A brilliant game and scenario put together by Dave B and really enjoyable (despite being wiped out) and a visual spectacle.

Isandlwana Part 2

Painting Coefficient December 2022

So it is that time of year to see if I have managed to reduce the overall “pile of pride” or have I failed and just added to the backlog to my painting table?

Germanic Warband

First up were the Germanic Warband for Infamy and something else to neat the Romans.

This started with the Infantry these are Victrix Miniatures with the shield transfers from Little Big Man Studios.

Warband on the move

The challenge with these was to make as many individual figures from the parts available and I think I manage to make all 60 unique with the various weapon and head options.

Next up were the infantry skirmishers these are bow armed and come from Warlord Games.

Archers

Then we had some cavalry, for the sharp eyed amongst you there are a couple carry captured roman shields.

Cavalry
Liberated shields

We then have both the foot and mounted command; these are again from Warlord and it would appear that some of the figure designers are taking inspiration from Games Workshop (note the foot on tree trunk pose).

Cavalry Command
Cavalry command
Main man
Infantry Command

The Warlord figures are all cast in “Warlord Resin”, while they painted up nicely enough and did have some good details the jury is out on the flexibility side and how well they will stand handling.

Total: 100

Carthaginians

Now we have the newish project with the Carthaginian force for the Punic Wars. First up are some of the Libyan Spearman accompanied by the Libyan Skirmishers.

Libyan Spearmen
Libyan Spearmen
Officers
Javelins
More Javelins

Total: 39

War of Spanish Succession

To finish off the Guard Brigade for my French first off we have a unit of Guard Francais accompanied by a battalion of the Guard Swiss.

Garde Swiss
Garde Francais

Total 36

Last 3 Months

So, what does all this mean for the coefficient

Total Number of figures added = 146

Total Number of figures painted = 175

Overall Coefficient = -29

But more importantly over the year have I managed to decrease the overall size of the “pile of pride”

Total Figures Painted = 525

Total Figures Added = 309

Overall Coefficient for 2022 = -216

Although the total figures painted is slightly down from last years total of 573 still feel that it was a decent effort. Especially as I also broke my personal best for the number of fishing trips I managed this year 😁.

Therefore, a success and a reduction overall, at this rate in 9 years’ time (one less than last year) I may be able to get around to that 20mm Soviet cavalry I have languishing in a drawer 😊

The question is what is going to be the main focus for 2023, well the initial focus will be on the following three projects:

  • Punic Wars
  • War of Spanish Succession
  • French Napoleonic

But that all depends on nothing new and shiny appearing on the horizon.

Painting Coefficient December 2022

Battle of Florence

Manage to sneak a game in between Christmas and New Year. For the last couple of months being fighting a small Italian Wars campaign with “Broken Dice” David (French), Nigel (Venetian League) and myself (Spanish Imperialist).

In that time “Broken Dice” and Nigel have hammered each other in battles in Northern Italy as I have been strolling up the Italian Peninsula collecting the various cities along the way and spending a short break in Rome.

However as the Venetian League was rapidly becoming the “meat” in a Spanish and French sandwich decided to try and stop my Spanish forces taking Florence.  Therefore the forces clashed on the plains outside Florence. The forces are from “BD” and Nigel’s collections.

The terrain had been randomly generated a series of low hills lined one side of the board while three walled enclosures were dotted around the field. I chose the side opposite the hills as I didn’t want to hand the defensive fields to the Italians however it didn’t work out as I had planned.

The Italians soon marched onto the field to occupy the hills.

Venetian League forces start to deploy
More Italian State infantry

The Spanish were deployed with infantry battalia on the right and centre, my light cavalry forces (Jinetes and Stradiots) on the right and the heavy cavalry units deployed in the centre to support the infantry. The overall Spanish plan was to push on the right to turn the Italians flank while advancing in the centre and delaying on the left.  

Lead elements of the Spanish army

The Spanish advance started as expected but the Italian shooting was inflicting casualties but more annoyingly disordering lead elements of my troops hindering the advance.

Advance begins

While most of the Italians held on the hill line a Swiss and Italian Infantry battalia advanced in their left flank.

Swiss advance

The Italians made it to the outside wall of the enclosure on my right flank before I could get there and took up defensive positions. My initial pike charge came up short. The pike then became stuck as the Italians kept them disordered for several turns 😒.

Grind begins

My delaying tactics on the left flank worked somewhat and slowed the advance however the Italians soon drove my skirmishing cavalry back and out of the enclosure.

Skirmishers driven back

This did lead to the lead Italian horse taking casualties from firing.

Italian Mounted Arquebus taking casualties

The fighting on the right flank continued and each side slowly inflicting casualties and wearing each other down.

Trying to clear the flank

Trying to speed things up the Spanish Celedas heavy cavalry launched a charge on the Italian Arquebus who failed their command roll which would have enabled them to seek the cover of the supporting pike. They were ridden down and now Nigel’s luck changed and in a direct opposite of his shooting the supporting infantry rolled low and joined the rout while the supporting pike fell back. This broke the battalia. Thankfully for the Spanish he then continued with this approach for the rest of the game.

Picking on the infantry

And then his shooting dice betrayed him and on the first opportunity to throw 2 dice with his artillery rolled a double 1 and his gun exploded and was out of action.

Oops

On my left flank things were not going so well and the skirmish cavalry while delaying the Italians had been broken and one of my pike units had been pushed back but at the moment the flank was still secure(ish).

Spanish driven back

My cavalry that had cleared the infantry was now in a tricky position and the Italian cavalry on its flank turned and the General led a charge into its flank. While it was beaten it retreated which meant in turn the Italian Cavalry’s flank was exposed.

Exposed flank

With a number of the Italian Battalia now shaken they started a wider advance to try and damage some of the Spanish infantry battalia.

Advance begins

In the centre my Spanish Men at Arms had finally deigned to join the fray (they had failed 5 command rolls and only appeared on turn 8!!!). But this did give them the opportunity to charge the Italian cavalry in the flank and shake them.

Cavalry clashes

The Italian infantry on my right flank were now just one unit away from being broken. To try and remove the pressure the Swiss pike from the broken battalia launched a charge against some Spanish Arquebus. These failed to retreat to the cover of the pike but as a veteran unit automatically passed their “break test” and stood. Even more surprising was that they stood on the next turn (I threw a 12😲🤣).

Infantry hold

We were approaching the end of the game but just in time the Italian infantry on my right flank broke and this meant that the Italian force was also broken and had to retreat from the field.

End of the battle

A close-run game, but also interesting as I did not try some of the more “daring do” manoeuvres as this could have affected the casualty count and also future games. Oh and Nigel thanks for the guns I have added them to my artillery park 😁.

Battle of Florence

Where’s the pigeon

For a quick pre-Christmas game “Broken Dice” hosted a Wings of Glory jamboree.

The Allies being flown by Dave A, “Broken Dice” David and “Uncle Albert” Julian while the dastardly Hun were flown by Dave B, Paul and myself.

To start it was a quick “dawn patrol” which pitted a flight of Sopworth Snipes vs Fokker DVII’s.

In the early exchanges things did not go well for old “Herman” as one of the hits also set him on fire.  Having survived the fire, he then went one better by drawing the explosion card and disappearing in a ball of flame. But that did mean the rest of us couldn’t draw it.

Things not going well for Herman

I could have been accused of “stooging about” away from the main combat but at this stage I had just taken two lots of “critical” damage. The first had jammed my rudder so I could not turn right and then I drew the jammed ridder that meant I couldn’t turn left. All I could do this turn was fly straight!!!

Stooging around the edge

Being reduced in number the Huns in the sun concentrated fire and manage to even things up by removing one of the Snipes.

Then there were two

Some good luck meant that another Snipe soon followed and then the final Snipe already trailing smoke fell under the German guns and fell from the sky. Round 1 over and the score was 5 vs -1 to the Hun.

Then there was one

The next game saw us go slightly earlier and it was a flight of Albatross D111 take on a flight of Sopwith Camels. It did not take long before one of the Albatross was trailing fire and smoke after being hit.

Early flames on the Albartoss

But revenge was gained when one of the Camels was hit and also started trailing flame and smoke.

Could have smarted

While it survived the fore the Camel was soon proving to be a bullet magnate as everyone knew it was heavily damaged.

Survived for now

And it finally perished under the guns of an Albatross.

Exchanging shots

But soon after that the Brits got revenge as they downed a second Albatross.

Oops

It was now 2 versus 1 but a Camel flew passed the guns of an Albatross and it was now 1 versus 1.

Done

However this didn’t last for long as an exchange of fire between the last surviving planes saw the last of the Albatross plumet from the sky. The overall score was now 6 vs 3 to the Hun.

Head on shots

The next mission was a “photo reconnaissance” mission where the Allies had two scouts and a two-seater. The two-seater had to take a photo of the target and then return to its own lines. The Germans this time had a flight of Fokker Dr1’s. As the two-seater approached the target a Dr1 managed to get on to its tail and release a stream of bullets. At this point Dave A kindly drew the explosion card for his damage and plummeted from the skies.

Trying to stop the recce

With no need to guard the target anymore all three of the Dr1’s turned to hunt down the remaining two allied scouts.

Thats sorted that

Now it was a challenge to hunt down the nimble Sopwith Triplane without getting too much damage on the Fokkers as they are rather brittle.

Hunting down the scouts

Head on attacks are not the best approach but in the case was effective as another allied plane disappeared from the skies.

Not the best approach

The end came when the Sopwith flew across the Fokkers guns and just couldn’t quite get a reply as it plummeted from the skies.

Tripehound down

So that was that a few fun games and a cracking lunch provided by “Broken Dice”. Oh and the final score was 10 vs 4 for the Hun.

Where’s the pigeon